Lesion Removal Program
The lesion removal program is a tool that allows the user to remove abnormalities from CT studies and also to harvest abnormalities into a library. It runs under IDL. Before running LesionRemove for the first time, the user must create a library file to store abnormalities. This program is called LesionLibraryCreate. Running this program will create a file on the C drive named LesionLibrary0.img. This file must be present for the LesionRemoval program to run.
Note: LesionLibrary0.img can hold 64 lesions. When this file is full, a new file can be created by running the LesionLibraryCreate program again. The new file will be named LesionLibrary1.img. The LesionRemoval program should be modified to call this file instead of LesionLibrary0.img.
Program Operation
With IDL installed, the LesionRemovalProgram is run through IDL. It should be compiled and then run. The program will start by asking the user to select a CT data set with . “.vox” extension. An example file is available for downloading (A040.vox). Select that study. The central slice is the file will be displayed. The slider control immediately under the image controls the image being displayed. Move the slider to select image 70. In this slice there is a lesion that is visible in the left lung. Use the mouse to locate the cursor on the lesion and click. The display will look like Figure 1 below:
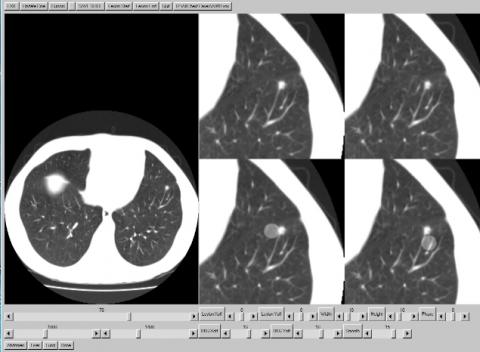
The display on the right has 4 expanded views centered on the lesion. The upper left quadrant shows the expanded view by itself. The lower left shows the expanded view with the lesion region superimposed. This shows the area which will be removed The location of the this region can be adjusted with the sliders labeled Lesion Xoff and Lesion Yoff. The size and orientation of the region is adjusted with the Width, Height and Phase sliders. The Phase slider adjusts the angular orientation of the region.
The lower right quadrant shows the expanded view with the background region. This region shows the background region which will replace the area covered by the lesion region. The location of the background region can be independently adjusted with the BKG Xoff and BKG Yoff sliders. The smooth slider adjusts the amount of smoothing that is applied to the region mask. The figure below shows the result when the region parameters have been properly adjusted.
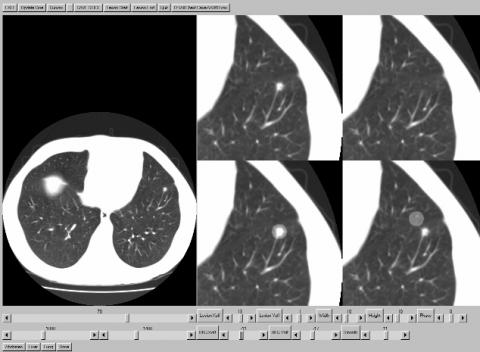
The upper right region shows the result of the replacement routine. This is updated in real time with the change of any of the adjustments. When the user is satisfied with the appearance of the image in the upper right quadrant, they should click on the Save Slice button located above the full image. This saves the change to the slice and the user can move on to the next image. When all the changes have been made, the user hits the EXIT button. A new file is created labeled A040M.vox with the changes.
To include a lesion in the library, simple display the slice in which the lesion is first seen. Click on the lesion location in the image and then click the Lesion Start button. Now, translate through the slices until the slice is displayed in which the lesion is last seen. When that slice is displayed, click on the Lesion End. A 64 x 64 matrix with the lesion at the center will be grabbed from each slice and placed in the library.
Contact Info for Abnormality Tools
Questions regarding the abnormality manipulation tools should be directed to Dr. Mark Madsen (mark-madsen@uiowa.edu).